# Anypoint Community Manager Package Post Installation Instructions

{% hint style="warning" %}
Make sure that [Lightning Web Service is enabled in your organization](https://developer.salesforce.com/docs/platform/lwc/guide/security-lwsec-enable.html).
{% endhint %}

After installing the Revenium Unmanaged Package within the context of Anypoint Community Manager (ACM), there are a few steps needed before you can use it in your organization.

### Important ACM Pre-Requisites:

{% hint style="danger" %}
ACM setup requires a scope to be set in the named credential for Anypoint in Salesforce to determine which APIs from Anypoint can be visible in the Revenium package.

* Search in Salesforce for "Named Credentials" and the "Anypoint" named credential to verify this is set up correctly (Figure 1).
  {% endhint %}

<figure><img src="https://2470865788-files.gitbook.io/~/files/v0/b/gitbook-x-prod.appspot.com/o/spaces%2FSUfCzMW8qWeXstipFXEh%2Fuploads%2Fgit-blob-17ce3fb4f52fda6f9327dadeae064d4ab36e55e9%2Fimage.png?alt=media" alt=""><figcaption><p>
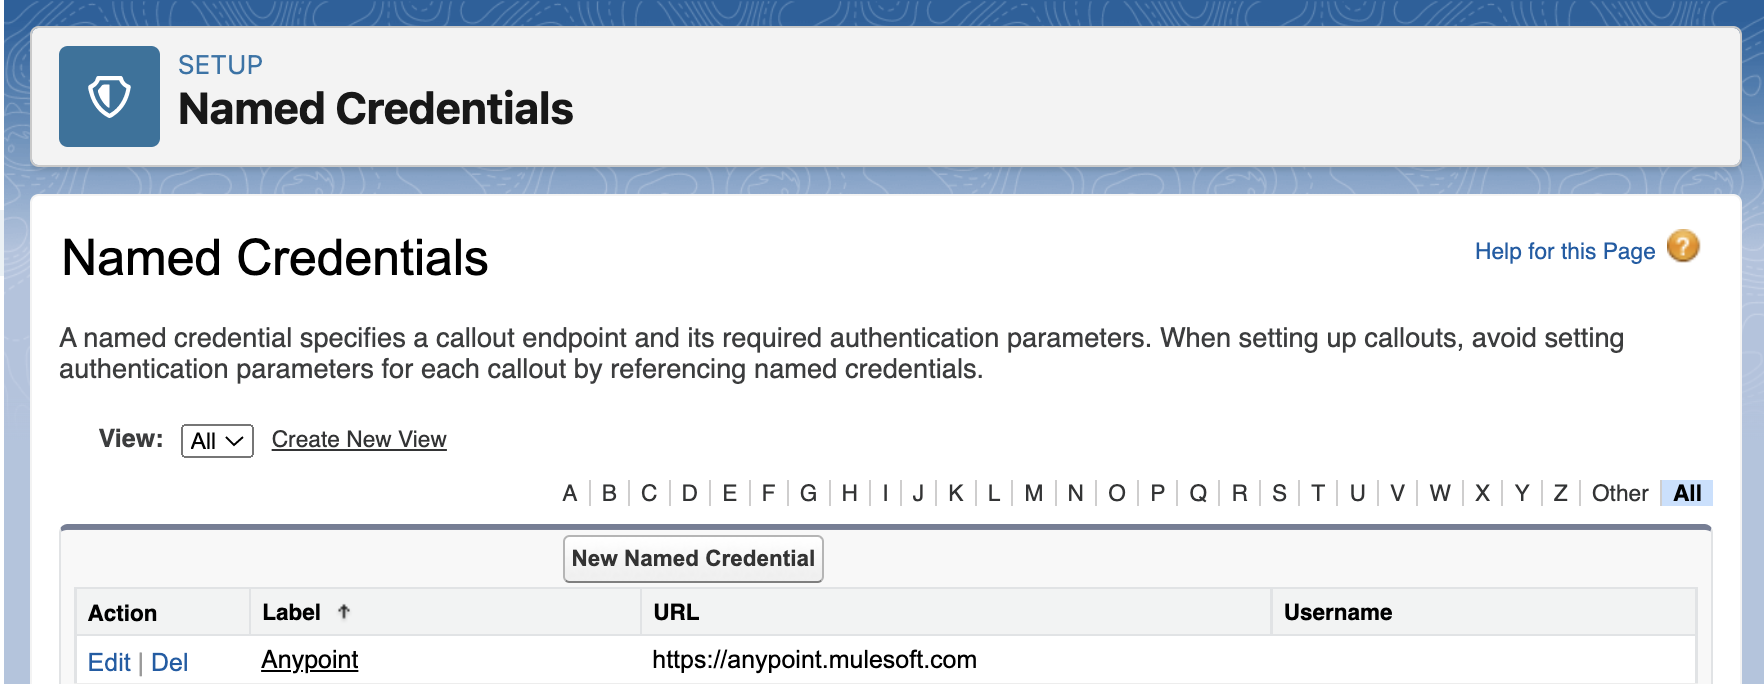
Figure 1. Named Credential Requirement:</p></figcaption></figure>

You also need to make sure your subscribers in ACM are assigned to a [Team](https://docs.mulesoft.com/access-management/teams) in Anypoint Platform with the following permissions:

| Category    | Permissions                               |
| ----------- | ----------------------------------------- |
| Exchange    | Exchange Viewer                           |
| API Manager | <p>Manage Contracts<br>View Contracts</p> |

Table 1. Anypoint Team's configuration.

{% hint style="warning" %}
If you would not like to receive the default Anypoint email notifications [follow this guide](https://help.mulesoft.com/s/article/Disable-Default-Anypoint-Email-Notifications-does-not-work).
{% endhint %}

## 1. Updating the Revenium API Credential External Credential

{% hint style="danger" %}
[Please ensure the **Revenium API Credential** External Credential Principals are enabled in the **Revenium User** Permission Set for proper API access](https://help.salesforce.com/s/articleView?id=xcloud.nc_enable_ext_cred_principal.htm\&type=5).
{% endhint %}

To ensure seamless integration with Revenium, you must update the **Revenium API Credential** External Credential in Salesforce [with the one you obtained from Revenium](https://docs.revenium.io/ai-and-api-monetization/api-integration-keys).

Follow these steps to locate and modify the External Credential:

1. Navigate to **Setup**:
   * In Salesforce, click the gear icon (**Setup**) in the top-right corner.
   * Select **Setup** from the dropdown menu.
2. Access **Named Credentials**:
   * In the Quick Find box on the left sidebar, type "**Named Credentials**".
   * Select **Named Credentials** under Integrations.
3. Locate the **External Credential**:
   * On the **Named Credentials** page, find and click on the **Revenium Named Credential**.
   * On the **Revenium Named Credential** detail page, locate the **External Credentials** section and click on the **Revenium API Credential**.
4. Edit the API key in the Custom Header:
   * Within the **Revenium API Credential** details, locate the section related to "Custom Header Parameters".
   * Find the custom header parameter with the name `X-API-KEY`.
   * Click Edit next to this parameter.
   * Replace the existing value [with the new API key obtained from Revenium](https://docs.revenium.io/ai-and-api-monetization/api-integration-keys).
   * Click Save.

## 2. Add Trusted URLs

1. Go to **Setup > Security > Trusted URLs** and click on **New Trusted Site** (Figure 2).
2. Create the required Trusted Sites as described in Table 2.

<figure><img src="https://lh7-us.googleusercontent.com/e2n0Z4UzuadhZRiLRyAF4oqGVdd0cd39c4ybC8LVyHxOI3E_xHCyEpObbKcwDusJeKLAPBzNOLqp_vYAo4DvRNmn6eZcr9lYofqpXRbiuOnY7SFmfiLhdsTALBvHetf432WbsIKKnSag9suVt90Zh_M" alt=""><figcaption><p>Figure 2. New Trusted Site button.</p></figcaption></figure>

<table><thead><tr><th width="145">Trusted Site Name</th><th width="231">Trusted Site URL</th><th width="80">Active</th><th width="94">Context</th><th>CSP Directives</th></tr></thead><tbody><tr><td>Revenium_API_URL</td><td><a href="https://api.revenium.io/">https://api.revenium.io/</a></td><td>Yes</td><td>All</td><td>Allow site for connect-src, Allow site for frame-src</td></tr><tr><td>Stripe_API</td><td><a href="https://js.stripe.com">https://js.stripe.com</a></td><td>Yes</td><td>All</td><td>Allow site for connect-src, Allow site for frame-src</td></tr><tr><td>Google_Pay</td><td><a href="https://pay.google.com">https://pay.google.com</a></td><td>Yes</td><td>All</td><td>Allow site for connect-src, Allow site for frame-src</td></tr><tr><td>Raygun_API</td><td><a href="https://cdn.raygun.io">https://cdn.raygun.io</a></td><td>Yes</td><td>All</td><td>Allow site for connect-src</td></tr><tr><td>Revenium_CDN</td><td><a href="https://cdn.prod.hcapp.io">https://cdn.prod.hcapp.io</a></td><td>Yes</td><td>All</td><td>Allow site for img-src</td></tr><tr><td>Salesforce_Maps</td><td><a href="https://maps.a.forceusercontent.com">https://maps.a.forceusercontent.com</a></td><td>Yes</td><td>All</td><td>Allow site for connect-src, Allow site for frame-src</td></tr></tbody></table>

Table 2. Trusted URLs configuration.

{% hint style="info" %}
If you use external images in your product description fields that support markdown syntax, you need to add the images host to the Trusted URLs configuration with the "Allow site for img-src" option enabled.
{% endhint %}

## 3. Configure Remote Site Settings

1. Go to **Setup > Security > Remote Site Settings** and click on **New Remote** Site (Figure 3).
2. Create the required Remote Sites as described in Table 3.

<figure><img src="https://lh7-us.googleusercontent.com/N1RYWIuRW81Dhixx7fUqOZux4qZyVIRjf5vrBGRclAo6-P269eXEqsX5GVPpGyC7jCN6Enefd6KaImv5qGWq6C3GHKqnYkmuefutpcg5C3_vZ3FCbkxQxjG3JOuhc37T42G1Z5oWtJxrE66nFqdRNAg" alt=""><figcaption><p>Figure 3. New Remote Site button.</p></figcaption></figure>

<table><thead><tr><th>Remote Site Name</th><th width="344.5999755859375">Trusted Site URL</th><th>Disable Protocol Security</th><th>Active</th></tr></thead><tbody><tr><td>Revenium_API_URL</td><td><a href="https://api.revenium.io/profitstream/">https://api.revenium.io/profitstream/</a></td><td>Yes</td><td>Yes</td></tr></tbody></table>

Table 3. Revenium API Key configuration.

## 4. Assigning Revenium User Permission Set.

When using the Revenium Salesforce Package with a Salesforce Profile different from **System Administrator**, you need to assign the Permission Set **Revenium User** to the subscribers under that profile in order to make it work. To do this, go to Setup > Permission Sets > **Revenium User** > Manage Assignments (Figure 4). After that, assign the corresponding Subscribers to it and click **Next** (Figure 5). Finally, select an expiration date if appropriate and click **Assign** (Figure 6).

<figure><img src="https://2470865788-files.gitbook.io/~/files/v0/b/gitbook-x-prod.appspot.com/o/spaces%2FSUfCzMW8qWeXstipFXEh%2Fuploads%2Fgit-blob-3621cf474cb414650b9eb2c668b06a1d6f63b308%2Fimage.png?alt=media" alt=""><figcaption><p>
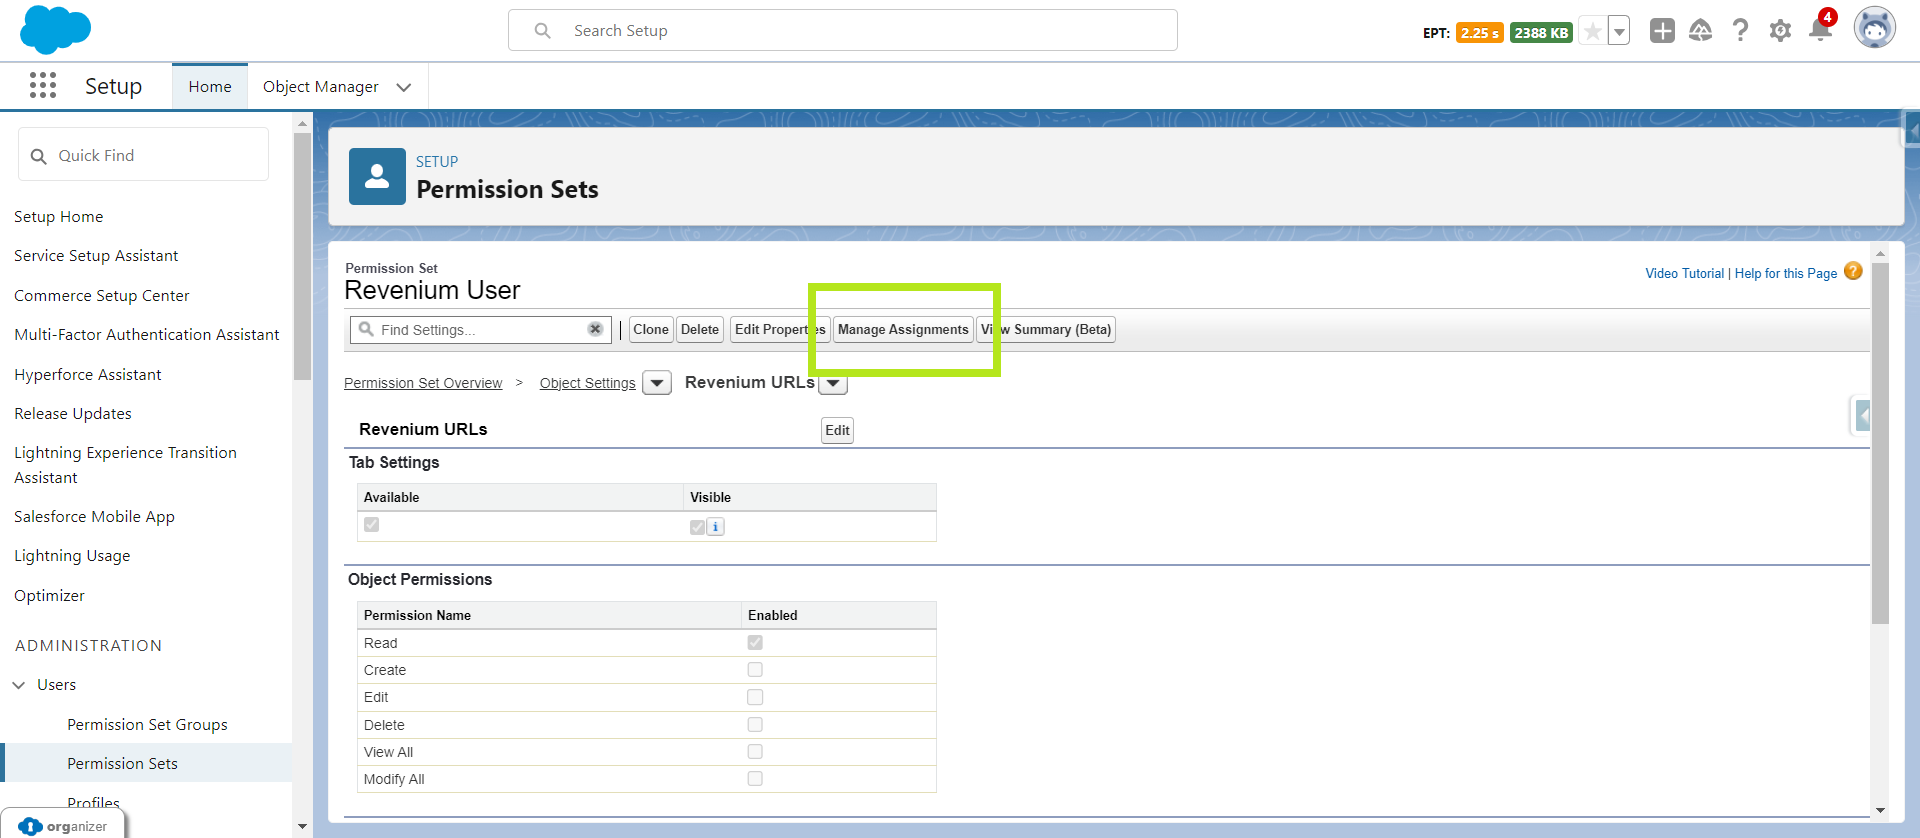
Figure 4. Permission Set's Manage Assignments button.</p></figcaption></figure>

<figure><img src="https://2470865788-files.gitbook.io/~/files/v0/b/gitbook-x-prod.appspot.com/o/spaces%2FSUfCzMW8qWeXstipFXEh%2Fuploads%2Fgit-blob-8bbd8845e2819761ae6259431d02c5fadea1f001%2Fimage.png?alt=media" alt=""><figcaption><p>
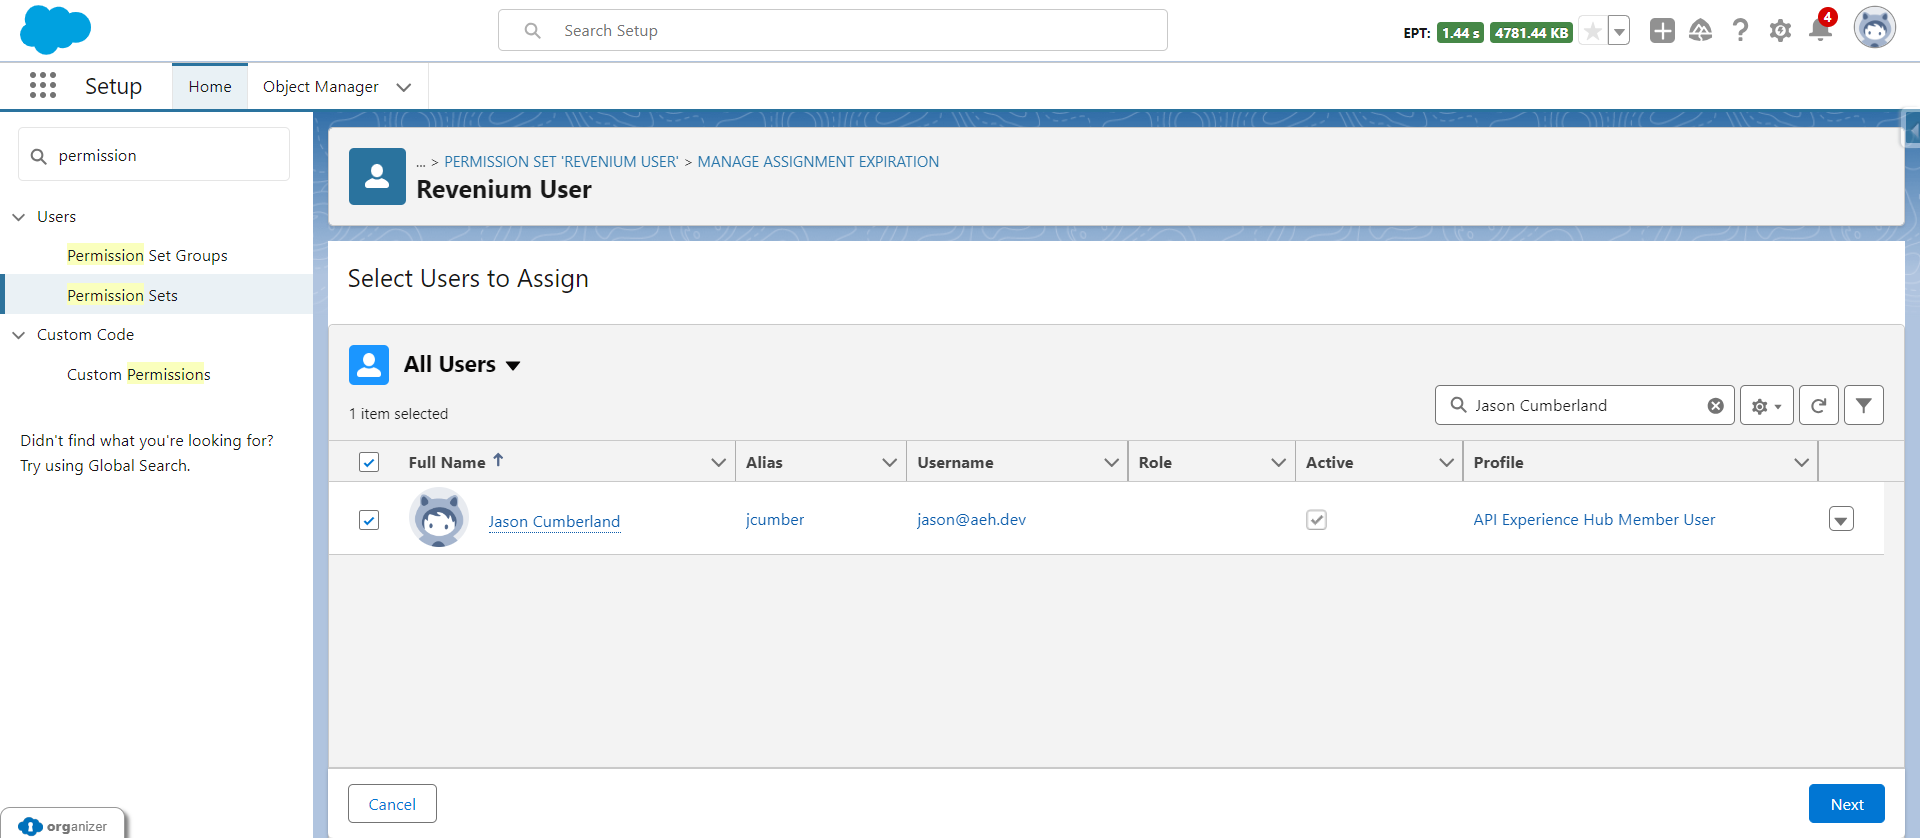
Figure 5. Permission Set assignment.</p></figcaption></figure>

<figure><img src="https://2470865788-files.gitbook.io/~/files/v0/b/gitbook-x-prod.appspot.com/o/spaces%2FSUfCzMW8qWeXstipFXEh%2Fuploads%2Fgit-blob-44280206480bda2781a308aa65acdf04d11a251a%2Fimage.png?alt=media" alt=""><figcaption><p>
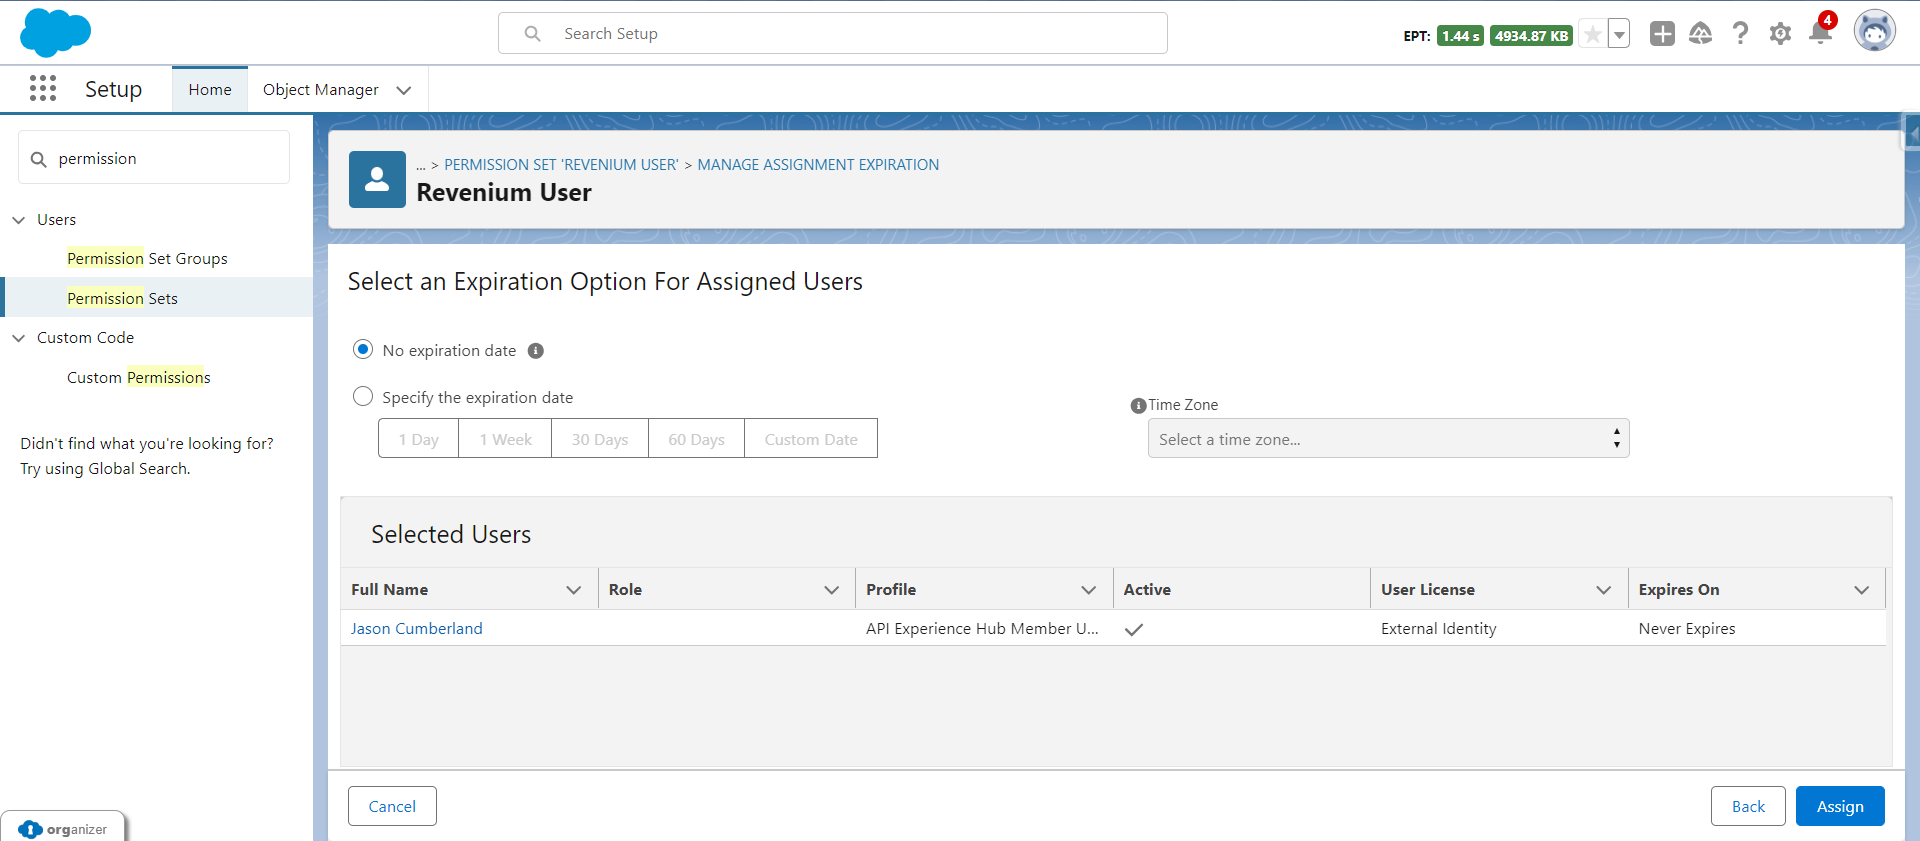
Figure 6. Setting an expiration date for the Permission Set.</p></figcaption></figure>

## 5. Configuring the Guest User and Profile-based Access.

When using the Revenium API Commerce Salesforce Package with a **Guest User**, you need to add the permissions specified in Table 4 for the minimum permissions that need to be applied.

If your organization requires granting access through standard Salesforce profiles (instead of Permission Sets), you must manually add the required field and object-level permissions to each relevant profile.\
This approach allows you to customize access for different user groups according to your security model.

| Name                                | Type                                        | Permission |
| ----------------------------------- | ------------------------------------------- | ---------- |
| Current HC Org                      | Field (Object: User)                        | Read/edit  |
| AnypointRepository                  | Apex Class                                  | Access     |
| ApplicationsRepository              | Apex Class                                  | Access     |
| AssetsRepository                    | Apex Class                                  | Access     |
| CommerceRepository                  | Apex Class                                  | Access     |
| CommunityFilterRepository           | Apex Class                                  | Access     |
| DataParserUtil                      | Apex Class                                  | Access     |
| DateHelper                          | Apex Class                                  | Access     |
| ElementsRepository                  | Apex Class                                  | Access     |
| GraphQLRepository                   | Apex Class                                  | Access     |
| IntegrationHelper                   | Apex Class                                  | Access     |
| InvoicesRepository                  | Apex Class                                  | Access     |
| MetricsRepository                   | Apex Class                                  | Access     |
| OrganizationsManager                | Apex Class                                  | Access     |
| OrganizationsRepository             | Apex Class                                  | Access     |
| PaymentsRepository                  | Apex Class                                  | Access     |
| ProductKeysRepository               | Apex Class                                  | Access     |
| ProductsRepository                  | Apex Class                                  | Access     |
| ReveniumRepository                  | Apex Class                                  | Access     |
| UserHelper                          | Apex Class                                  | Access     |
| UsersRepository                     | Apex Class                                  | Access     |
| Revenium\_API\_Credential - API Key | Enable External Credential Principal Access | Enabled    |
| User External Credentials           | Object                                      | Read       |

Table 4. Required permissions.

{% hint style="info" %}
This following step applies only to Guest User configuration. Follow it only if your site is enabled for public access and allows guest subscribers.
{% endhint %}

To continue setting up Guest User access, follow these steps:

1. In Salesforce Setup, enter sites in the Quick Find box and select **All Sites**.
2. Next to the site that you want to access, click **Builder**.
3. In Experience Builder, click the **Settings icon** and select **General**.
4. Under Guest User Profile, click the guest user profile link (Figure 7).

<figure><img src="https://2470865788-files.gitbook.io/~/files/v0/b/gitbook-x-prod.appspot.com/o/spaces%2FSUfCzMW8qWeXstipFXEh%2Fuploads%2Fgit-blob-9707319e2d153f123c02b442e7dca5df018c2e75%2Fimage.png?alt=media" alt=""><figcaption><p>
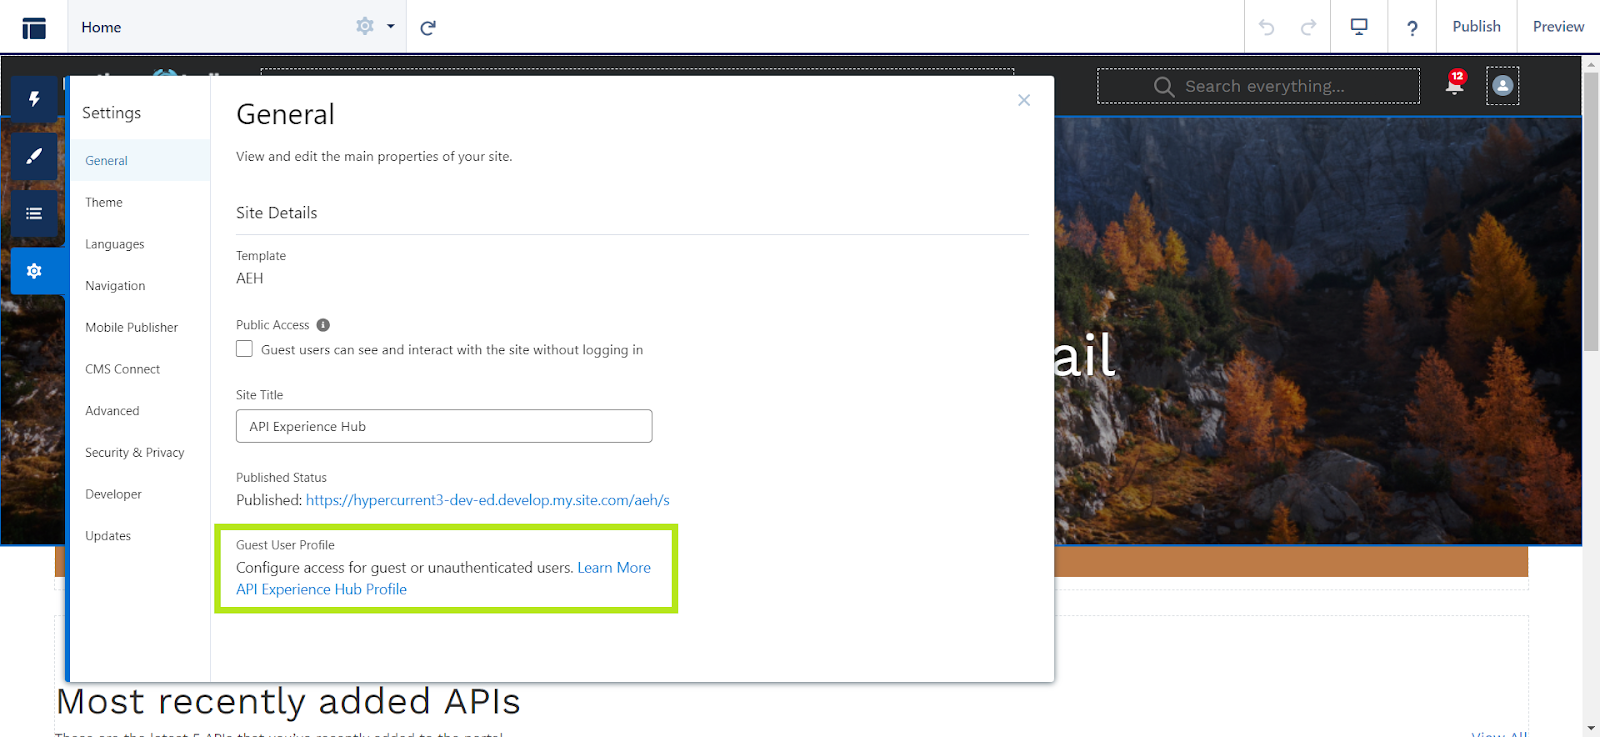
Figure 7. Guest Subscriber profile configuration access.</p></figcaption></figure>

In the Field-Level Security section you can set the Read/Edit access for the Current RM Org field from the Subscriber object (Figure 8). Moreover, in this profile menu you will see the options to enable access to Apex Classes, Custom Objects and Named Credentials listed in Table 4 (Figure 9).

<figure><img src="https://lh7-us.googleusercontent.com/lrfhlBsGWdHp4ZwIflhtZqOrYUJU81dlL7JoRHBEKNe8bMod-iCYVW_Mb_24gbINtcBx0nvzrwpTa_bsr4drskfsIQey70gsQ94zFzMv-G3QKgBp7n1Lo74MKMbMV8JzURigk98S1cN3LbEU9DXOwmA" alt=""><figcaption><p>Figure 8. Current RM Org Field Level Security settings.</p></figcaption></figure>

<figure><img src="https://2470865788-files.gitbook.io/~/files/v0/b/gitbook-x-prod.appspot.com/o/spaces%2FSUfCzMW8qWeXstipFXEh%2Fuploads%2Fgit-blob-402149bb66edb13e348344d4349efcb0d03d1769%2FUntitled.png?alt=media" alt=""><figcaption><p>
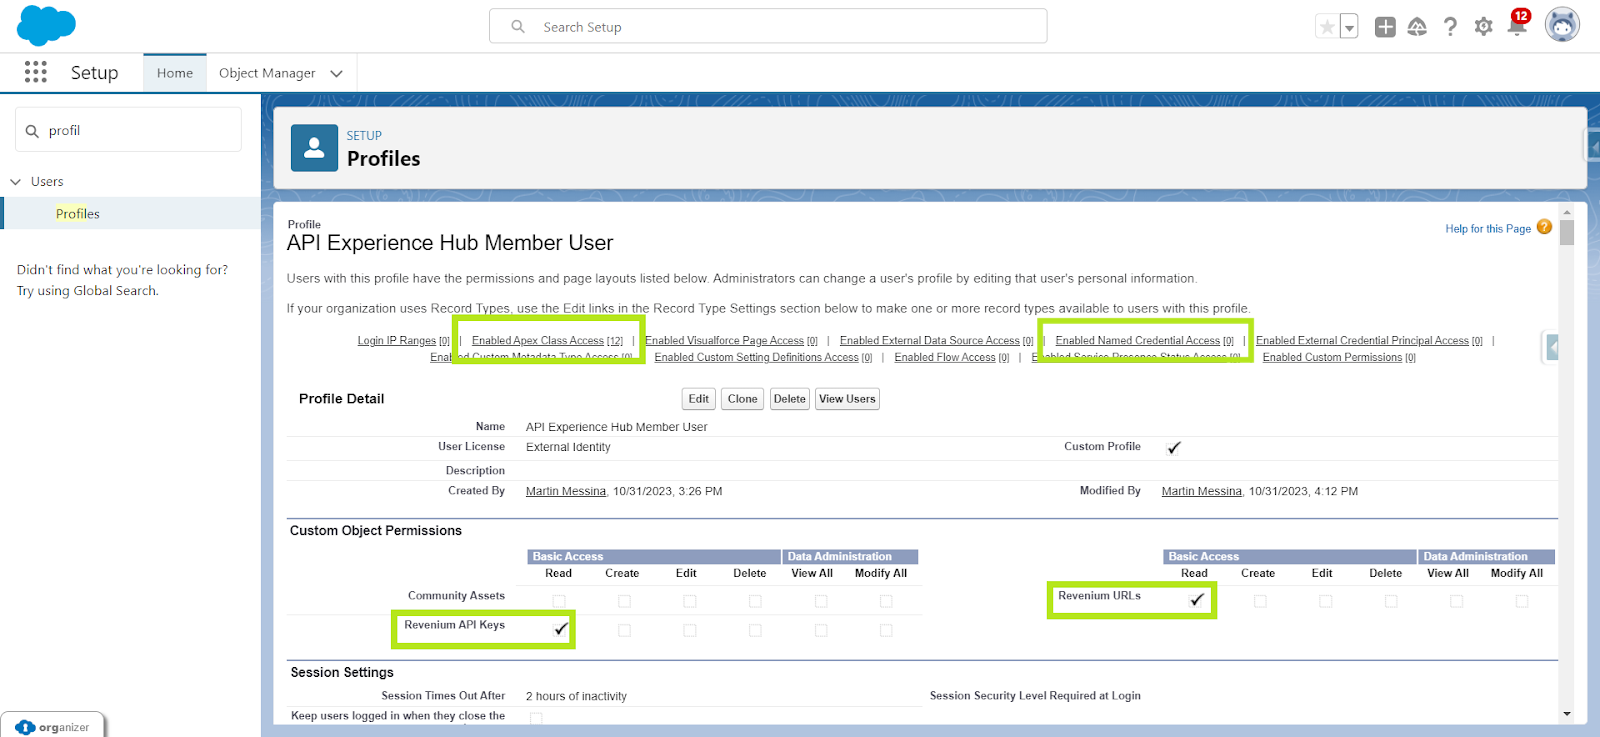
Figure 9. Edit Profile access to Apex Classes, Custom Objects and Named Credentials.</p></figcaption></figure>

Finally, allow the Guest Users to access Private Resources:

1. In the [site's Builder](https://help.salesforce.com/s/articleView?id=experience.community_designer_ui.htm\&language=en_US\&type=5), navigate to **Settings**, then select **General**.
2. Under **Guest User Profile**, click the profile name.
3. Click **System Permissions**.
4. Click **Edit**.
5. Select the **View Private Static Resources** permission and click **Save**.

## 6. Remove the API's standard request access button.

{% hint style="danger" %}
It is necessary to remove this button so that dev portal Subscribers only receive access to your monetized APIs through the Revenium drop-in storefront. This way you can require payment before access is granted.
{% endhint %}

In order to remove the API's standard request access button from ACM, shown in Figure 10, please drag and drop the **Remove Source Access** component above the Template footer on the Application Details page of the site (Figure 11).

<figure><img src="https://lh7-us.googleusercontent.com/Q2UpRCgIlEzwpeKuG74twvnXQBIi6ZUkLcDdLIhqMzV3ggH-53E4jS5YlevsfCo2gq8l3FncHc5XUM6_EDK42vbyU71syAqfdwJQqMz9YjZtyGF7xINWFiUdjwSKu8t0MAbm3biTmT-etpAV1K7SRHE" alt=""><figcaption><p>Figure 10. Standard request access button.</p></figcaption></figure>

<figure><img src="https://lh7-us.googleusercontent.com/yQkyzwKOZ2Bj63IB5M4AKz0Uh13Kh4Mqc67sVdkPbm0G6HiQXag6rv8thD65UYtx4p9yJKNWrryLP43Yw6RP2_9A5IqwWLzPNnDYk4_QEW_ZvOchkeWTw8e6wpfjkEuxPMQi7TeT_Rp6EHKNlX20ODs" alt=""><figcaption><p>Figure 11. Remove Asset Access component.</p></figcaption></figure>

## 7. Add products and Sources to your portal.

{% hint style="danger" %}
Not adding your products and sources to your portal will result in inconsistent behavior in your ACM account and the inability to view contracts in your portal.
{% endhint %}

Finally, you will need to add the products/sources you have created in Revenium to your ACM portal. To do this, first [create your product](https://docs.revenium.io/user-guide/manage/products#create-a-product) or [source](https://docs.revenium.io/user-guide/manage/assets#create-an-asset) in Revenium. Then, you will need to [synchronize them to your Anypoint's account](https://docs.revenium.io/integrations/mulesoft/anypoint-api-group-synchronization). After this, go to API Community Manager application in Salesforce and then go to the API Curator. Select the site you are working on from the site's dropdown menu shown in Figure 12.

<figure><img src="https://2470865788-files.gitbook.io/~/files/v0/b/gitbook-x-prod.appspot.com/o/spaces%2FSUfCzMW8qWeXstipFXEh%2Fuploads%2Fgit-blob-a766d17a6d0fc95c76a98d9aeecfadc8a6f245cb%2Fimage.png?alt=media" alt=""><figcaption><p>Figure 12. Selecting the site in the API Curator.</p></figcaption></figure>

Go to the **Sources in Anypoint Exchange** tab. If you've followed the previous steps you should be able to add the product/source to your portal site by searching for its name in the search box, selecting it and then clicking the **Add to your site** button, as depicted in Figure 13. Click **Add** in the following screen prompt.

<figure><img src="https://2470865788-files.gitbook.io/~/files/v0/b/gitbook-x-prod.appspot.com/o/spaces%2FSUfCzMW8qWeXstipFXEh%2Fuploads%2Fgit-blob-56e01ad13bcb500d0837645ba2fe91d4bde9ed5b%2Fimage.png?alt=media" alt=""><figcaption><p>
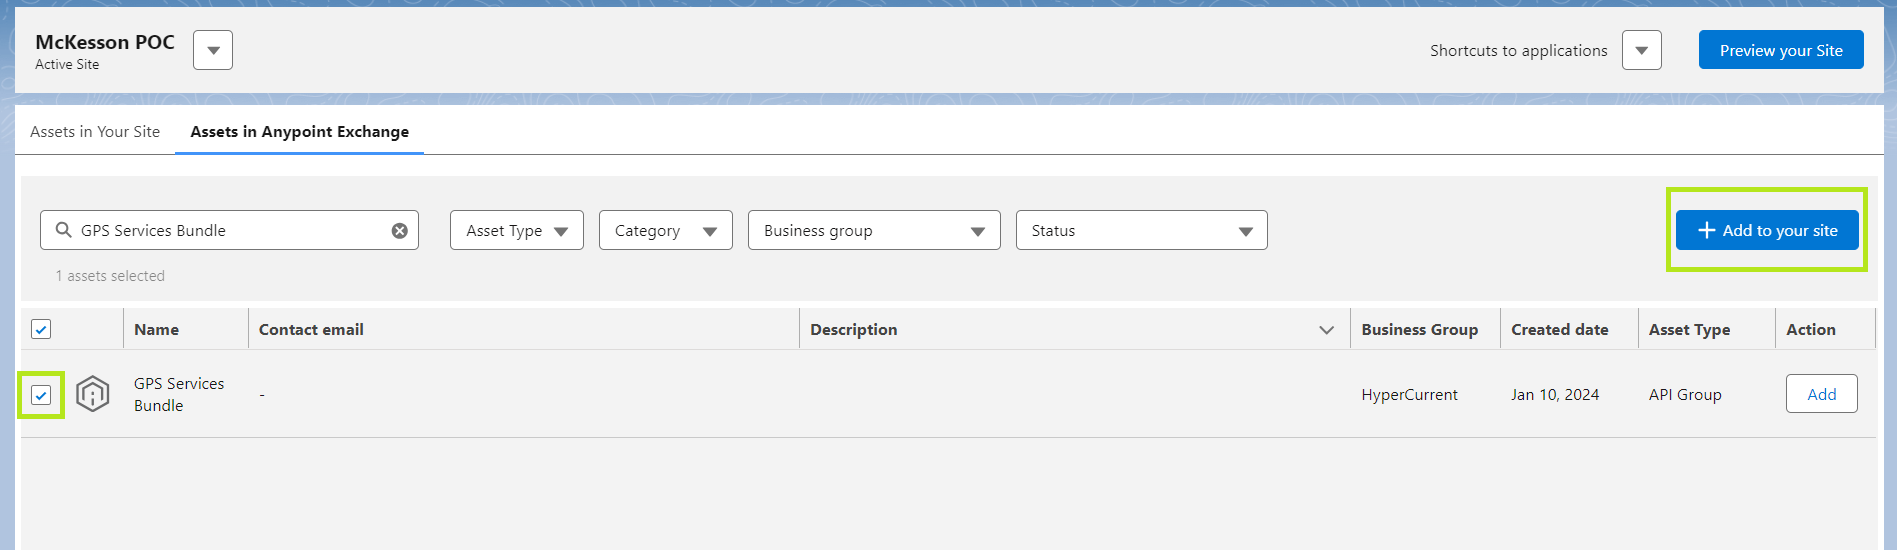
Figure 13. Adding your product/asset to your portal.</p></figcaption></figure>

To check that it has been properly added to your site, go to **Sources in your Site** tab and search for your product/source. If there were no errors in the process your product/source should be listed there (Figure 14).

<figure><img src="https://2470865788-files.gitbook.io/~/files/v0/b/gitbook-x-prod.appspot.com/o/spaces%2FSUfCzMW8qWeXstipFXEh%2Fuploads%2Fgit-blob-4b817459b85fe314533bb22ac1f38c317c420135%2Fimage.png?alt=media" alt=""><figcaption><p>
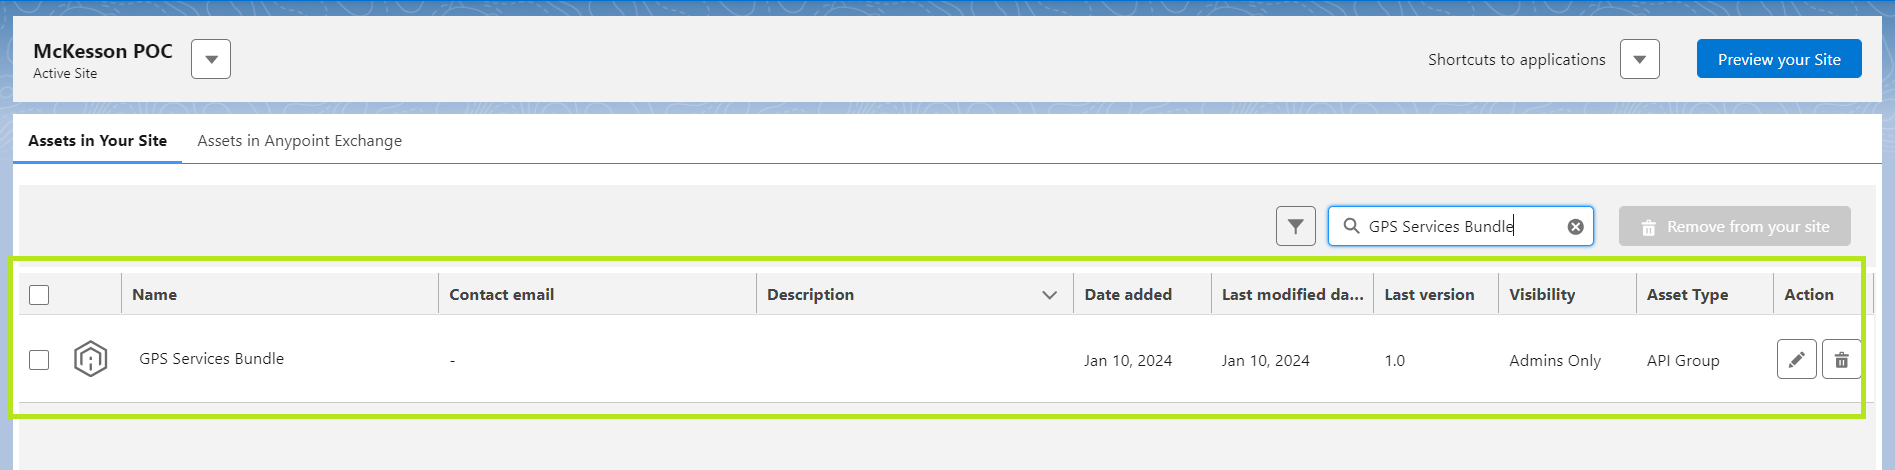
Figure 14. Checking that the product/asset has been added to the site.</p></figcaption></figure>

Your site is now all set for use with Revenium's ACM integration.

## 8. Set the Revenium API Access Requester button.

To ensure a smooth workflow for subscribers requesting access to your API bundles, it's essential to include the "View Available Products" button directly on your API Detail detail page (Figure 15).

By placing this component on an source details page, a button will appear that will do two things, 1) return the subscriber to the catalog page including the “Drop-In Storefront” component, 2) filter the list of displayed products in the displayed storefront to show only products that contain the source on the original page that the user was browsing.

This allows subscribers who are interested in using a particular API to understand which products they can purchase that include that API. By having the button readily available, subscribers can efficiently access the storefront and request access to the desired API bundles within a single, streamlined experience.

<figure><img src="https://2470865788-files.gitbook.io/~/files/v0/b/gitbook-x-prod.appspot.com/o/spaces%2FSUfCzMW8qWeXstipFXEh%2Fuploads%2Fgit-blob-a8939afb7c2f471648c0e1ae1a7f5cafe52b860b%2Fimage%20(139).png?alt=media" alt=""><figcaption><p>Figure 15. API Access Requester is put in the API detail page.</p></figcaption></figure>

You also need to provide the API name of the page your storefront is located [by following the instructions outlined in the API Access Requester documentation](https://docs.revenium.io/user-guide/integrations/mulesoft/commerce-lightning-web-components/api-access-requester). By default, the API Access Requester button redirects you to the Home page of your Experience Cloud site.

## 9. Common Issues & Troubleshooting Checklist

If the storefront is not working as expected, verify the following:

<table><thead><tr><th>Step</th><th width="253.7999267578125">Item</th><th>Common Issue</th></tr></thead><tbody><tr><td>1</td><td><strong>Permission Set Assignment</strong> - Ensure the <code>Revenium_User</code> permission set is assigned to all Experience Site users, <strong>or</strong> configure the Site Guest User profile according to the permissions table referenced in <strong>“5. Configuring the Guest User and Profile-based Access.”</strong></td><td>Users see "Insufficient Privileges" errors</td></tr><tr><td>2</td><td><strong>Named Credential Configuration</strong> - Verify <code>Revenium_API</code> Named Credential is properly configured with valid endpoint: <a href="https://api.revenium.io/profitstream/">https://api.revenium.io/profitstream/</a></td><td>API calls fail or return 401/403 errors</td></tr><tr><td>3</td><td><strong>External Credential Setup</strong> - Confirm <code>Revenium_API_Credential</code> External Credential has valid API key</td><td>Authentication failures on product/asset retrieval</td></tr><tr><td>4</td><td><strong>Component Placement</strong> - Verify <code>communityStorefrontContainer</code> is added to the Experience Site page</td><td>Blank page or missing storefront</td></tr><tr><td>5</td><td><strong>Mulesoft Organization ID</strong> - Ensure the correct Org ID is set in component properties</td><td>Empty product list or sync failures</td></tr><tr><td>6</td><td><strong>Tab &#x26; Display Options</strong> - Review component settings for desired visibility options</td><td>Missing tabs or unexpected UI behavior</td></tr><tr><td>7</td><td><strong>End-to-End Test</strong> - Test the full flow with a user who has the permission set assigned</td><td>Validates complete configuration</td></tr></tbody></table>
